How to build an insect hotel
Making a DIY insect hotel invites a wide diversity of native insects to your garden. By providing insects with shelter where they can nest, they will return the favor by cultivating the natural habitat, which is a key aspect of protecting biodiversity in your garden. Our instructions give you a step-by-step tutorial on how to build housing suited to different kinds of insects.
Wild bees, earwigs, wasps, moths, bumblebees, butterflies and many other insects play a vital role in increasing species diversity and biodiversity. They maintain the ecological balance by pollinating the flowers of countless plants so these plants can reproduce. They also eat other insect pests and their larvae.
By building an insect hotel, you will help insects to survive. This protected space will encourage beneficial insects to take up residence, enable them to live through the winter and provide them with food and shelter.
Things you will need and where to place it
Whether you put your insect hotel in your garden, on your balcony or on your patio, you should select a spot that is sheltered, warm and provides protection from wind and rain. Read “Setting up and mounting your insect hotel” to learn where to place your insect hotel.
Size
Your insect hotel can have as many chambers as you like and you can make it fit the size of the space you have available.
- A depth of 15 to 20 centimeters is ideal.
- The height and width depend on how many guests you would like to house. The more chambers you make, the taller and wider it will be.
The first step of our tutorial will tell you how to decide on the number of chambers.
Materials you will need
The variety and quality of the materials that you use for your insect hotel play an important role.
Ideally you should use untreated materials you find in nature that are mature and seasoned.
- The best wood to use is oak, beech, ash or the wood from fruit trees.
- Avoid using softwoods, wood from conifers or treated wood.
The individual chambers of your insect hotel should be filled with a wide variety of materials to attract as many different kinds of insects as possible. Wild bees prefer for example drilled holes and hollow plant stems.
Your imagination is your only limit to building your insect hotel. To inspire you, we have put together three lists of materials.
For the hotel:
- Planed wood boards (fruit crates or an old drawer can also be used)
- Wood screws or nails
- Wood saw
- Cordless screwdriver
- Wood glue
- Wire mesh
For the chambers:
- Hollow bricks
- Pipes
- Flower pots
- Aluminum cans
- Shelves
- Terracotta pots
For the nesting materials:
- Reed stalks, fresh straw, thin branches
- Hollow stems and pipes that are 2-8 mm wide
- Tree discs or hardwood with holes
- From your garden: Snail shells, stones, fir cones and pine cones
- Toxin-free, untreated wood shavings
- Egg cartons
- Bark mulch or leaves
- Pruning shears
Have you gathered all your materials? Then let’s start building.
Instructions for building an insect hotel
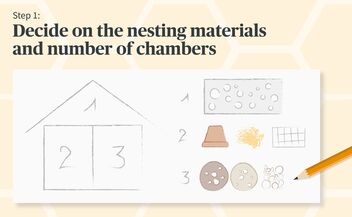
Insect hotel – decide on the nesting materials and number of chambers
Different kinds of insects have different sheltering needs. So first decide which type of insect you’re building for. The number of chambers determines how big your hotel will be.
- For an insect hotel for your garden, we recommend four to six chambers.
- Smaller insect hotels for your balcony or patio generally have two to three chambers.
- You can even build a mini hotel with just one chamber. It can be used for bees, for example, so they have a shelter of their own.
- For beetle larvae, ladybugs, lacewings and earwigs:
Straw serves as insulation to protect theses insects in winter. In spring, the straw shields the beneficial insects and their young from birds, for example. Pine cones mainly provide shelter and a place to hide, but are not very well suited for overwintering. - For native wasps and various native bees:
Tall plant stems such as hollow reeds or bamboo stalks are perfect nesting holes. Use pruning shears to cut the stalks to the length you want and stack them on top of one another. Use stems of varying widths so different-sized insects can use them.
Logs with holes drilled in them provide valuable shelter for wild bees. Drill small and large holes of between two and ten millimeters into the hardwood of deciduous trees. Do not drill all the way through so the bees and wasps can nest deep in the hole. Drill into the cut face of the log parallel to the bark and make sure the corners are smooth.
If using hollow bricks, these need to be prepared in advance. Mix the water and plaster and then lay out the hollow sticks. Fill the bricks with the plaster mixture and push the sticks about six centimeters down into the mixture. Let the bricks dry before you put them in the tiny house. - For butterflies:
Butterflies like compartments covered with thin twigs (no more than five millimeters thick). The twigs should be fresh so they are still flexible and easy to attach in the compartment.

Insect hotel – build the frame
You can choose any shape you like for your frame – from triangular to a traditional tiny house. Position the boards on the ground and use a saw to cut them to the right length. Plan out the back for your hotel. Screw or glue the boards together and then you have your frame.
Tip for the roof: A little porch roof made of roofing tiles, for example, will protect your hotel from the rain and damp. The roof should extend a good five to ten centimeters beyond the frame.
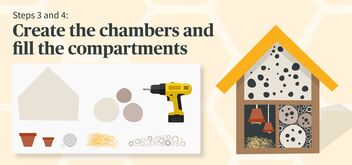
Insect hotel – chambers and compartments
Fasten the individual nesting aids and shelters to the wood frame. Use hollow bricks, pipes, flower pots, aluminum cans or boards to create the compartments. Place the individual compartments where you would like them inside the frame and fasten them to the frame with screws and glue.
Then fill the individual chambers with the materials you prepared above.
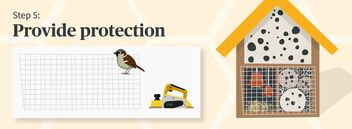
Insect hotel – protection
To protect the insects from birds, you can cover the hotel with some wire mesh. Leave about five centimeters of space between the mesh and the nesting materials. The mesh shouldn’t be too fine because the insects will need to be able to fit through it.
Setting up and mounting your insect hotel
Once your hotel is built, it’s important to find a suitable location in your garden or on your balcony. A good location means you will have lots of visitors at your hotel.
- Choose a place that is sheltered from the wind and rain. Ideally you should be able to screw it to a wall.
- The open side should face south so that the hotel receives as much sunlight as possible.
- To keep out possible predators, you should place it about 50 - 100 centimeters off the ground.
- You should place your hotel close to a source of water and nesting materials and near a flower meadow or bee-friendly plants. Here you can learn the right way to plant a flower meadow.
The best time to hang your insect hotel is in February or March because this is when insects come out of hibernation. But you can put it up any time of year. The insects will be happy to find a home waiting for them when they need it.
Care and upkeep:
How practical: The insects will do their own housekeeping in your hotel. You won’t need to do anything for them. The fewer changes you make to your insect hotel, the better it is for the insects.
- You should only change out the nesting materials and chambers if necessary. And be careful when you do.
- In spring all you need to do is clean up the cobwebs and leaf remnants.
- If you need to clean up bird droppings, etc., only use water.
- Never break open sealed nests – there could be live larvae inside.
Checklist: Here’s how to build an insect hotel
What should you know about building and maintaining an insect hotel? Our top 5 tips:
- Protect it from birds: They will hang out waiting for a meal. Fasten wire mesh or netting to your nesting areas and overwintering shelters. Animals can easily recognize mesh or blue plastic netting and they pose no threats to birds.
- Avoid hazards: Bee wings can be easily damaged. For this reason, you should make sure all pipes, stalks and boards are sanded smooth. Make sure to drill holes into the cut face of the log parallel to the bark.
- Respect biorhythms: Don’t move your insect hotel from the original spot where you placed it – not even in winter. If you move it to a warm garage or basement, you risk waking the insects up from their hibernation. But they won’t be able to find any food in winter. You don’t need to do anything to prepare for the winter or provide a warm cover.
- Keep these instructions on hand: It’s very important to choose the right materials. Before you start building, read the instructions on the proper materials to use and make note of the tips provided. This way your hotel will attract lots of guests.
- Store-bought or DIY: Nowadays you can find a large selection of insect hotels and kits that you can buy. If you decide to buy one, make sure that the materials are of very high quality. Straw, spruce cones, sawdust, wood chips and similar materials are indications of cheaply made versions. Building your own hotel will of course take some time. But if you use found and recycled materials, it will be a lot cheaper.


